Family trips

Our little princess Abigail has been traveling with us since 4 months old. Stay tune for more of our family trips!

Honeymoon in Maldives

A place where romance begins... And there is never a blue as beautiful as the waters of Maldives!

Sinchow Vietnam!

Go to Vietnam. Indulge yourself in the peaceful Hmong villages in Sapa, or experience cruising at The New 7 Wonders of Nature - Halong Bay.

Go West to U.S.

Napa Valley! San Francisco! And Monterey!.

Bali oh Bali~

We've done it 3 times!! Couple trip 2009, friends trip 2010, and family trip 2014.

Hello Macau, the oriental Portugal

Walking the oriental Europe. Remember to taste the most authentic Portuguese tarts!.

London

I was just a touch-and-go tourist in a short 3 days...

Babymoon in Boracay

Sea, sand, sun. And a new family member in my tummy!

Marrakech, a hidden jewel

Of palm groves, fire dancing, and dromedaries.

Siem Reap - day and night

Back to the ancient kingdom and find the tomb raider in you.

Home Cooking

Just some recipes and home cuisine for my family and baby.

Welcome to my blog!! 欢迎到访!!

No matter how you get here, I wanna say a big THANK YOU for visiting my blog. Do come back often for more! Blessed because we're given the chance to share. Thank you for visiting! 无论你是刻意或者不刻意的来到这里,都进来坐坐、聊聊天吧。幸福不是必然的,而是懂得分享人生的喜悦。谢谢到访!


October 12, 2014

How to pack light for your baby's day out during travel

Happy 57th Merdeka to everyone!!
In conjunction with our national day holidays, I decided to blog on this topic base on my experience. In fact I owe my friends this update for some time already...
This is one of the popular search for mommies who has planned for a trip with their little ones.

How to pack light when going out with your little one? Let me just list down the main ones first, and I'll update from time to time when another new technique of  mine is proven workable okay...

1. Baby's luggage. 
This is one of the most essential item when going for a few days trip.
Refer to my photo below on how I usually pack her clothes. I use the travel luggage organizer as her luggage. Don't underestimate its space, I could squeeze in 1 week's clothes.
The trick: Roll the clothes instead of fold them. I even organize them in such a way that I can easily pull out 1 set of outfit for the following wear. Rolling clothes is always the best technique for space saving during packing luggage, it works well for adult clothes too!


2. Baby's handcarry backpack.
Think about avoiding a lot of bags when boarding the plane? Leave your diaper bag + mommy bag behind. Get a backpack instead. I opt for the soft type material with PU skin so that it is more stretchable and waterproof. Always think of the weather factor...I learned that from my first trip with LO to Taiwan, it was rainy and my diaper bag + mommy bag + backpack carrying her breast milk all got wet. (>*<)"
The trick: Pack only essential items plus additional 3 pcs of diapers and 1 set of clothes. Spare 2 extra meals portion (milk or biscuits) in case of any delay. 
What to include: Thermos for hot water, thermoflask for food (I use it to warm breastmilk when still breastfeeding), tumbler, milk (powder/breastmilk in cooler bag), milk bottle, 2 pacifiers, 5-6 diapers, wet wipes, changing mat, a few hankies, small feeding plate with cover and spoon, spare clothes & jacket, pillow, biscuits, 1 of her favorite toy/book, and some plastic bags.
Ground rules to follow so that you don't have to start 'digging' when searching for the items - heavy items at the bottom, frequent use items stack on top, small items in pockets. 
That's why I choose this type of backpack with a few compartments and pockets.


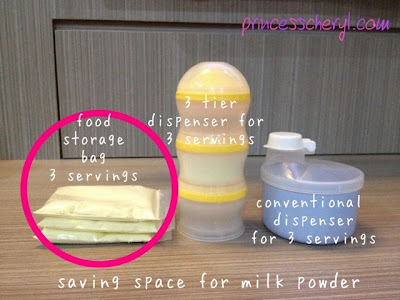
3. Space saving for milk powder storage.
When it comes to milk powder, the conventional way is to spare 3 meals in the dispenser, then the remaining meals in a small tin. Am I right?
The trick: Look at the difference in space occupied by each of these storage - food storage bag, 3-tier dispenser, and the 3-compartment dispenser. I would definitely go for the first one. I'm not going against recycling, you can still reuse the bags isn't it. After each serving, the total space occupied will definitely reduce.
And the following photo below shows the total space occupied in my luggage, for 6 days supply. 


4. Bring a light weight stroller and baby carrier.
The trick: Go hands-free with baby carrier when shopping or moving around in public transports, or even in the airport. Stroller can be your temporary shopping cart too. I always like baby carrier as my girl will just sleep whenever she wants to.


5. Bring a semi-transparent shawl.
I just realized that shawl is so useful from my recent trip. It can be your baby's temporary sunshade under the hot sun!
The trick: Easy to keep in the bag (almost weightless), and some new fun for the baby. As it's semi-transparent, baby can still see what's happening outside.


That's about all for now. Shall add in in future for new ideas. Or you may share in comment too.

By the way, this is my backpack size. My girl is now 19 months old, so you may estimate the size. :)


October 1, 2014

Homemade sushi for dinner!

28th August, sushi night at home

I realized Abigail was enjoying very much the Japanese rice when we were in Japan, so I decided to make sushi for dinner in one of those not-so-busy working day. Well...we miss eating Japanese food too... so ended up I took half day off to do the preparation. 

I had gathered some of the ingredients during weekend grocery shopping, and what's left to buy were Unagi and Salmon sashimi. Left company around 2pm, grabbed the fishes and reached home at 4pm. Ingredients preparation took me another hour plus. So I only started wrapping the sushi near 6pm, just in time for dinner.

The very last time I made sushi was back in year 2002 (wow that was really long ago!), and I had lost my cookbook... So this round I just base on gut feeling on the sushi wrapping hehe.

Ingredients:
Rice
3 rice cooker cups* (540ml) of uncooked Japanese rice* (I use Sumo Calrose Rice)
Water (follow instruction on the rice sack - 2 cups of water to 1 cup of uncooked rice)

Sushi Vinegar
⅓ cup (80 ml) rice vinegar
3 tbsp. sugar
1 ½ tsp. salt

Method for cooking sushi rice:
1. Rinse the rice in a strainer or colander until the water runs clear. 

2. Scoop the rice with your palm and gently rub them against each other. This is polishing. Rinse and discard water. Repeat this process 1-2 times.

3. Let the rice soak in water for 5 minutes. Drain out the water and transfer the rice into the rice cooker bowl. 

4. Add cold water following the instruction on the rice sack. Different brand may differ for the amount of water needed. The brand of rice I use is Sumo Calrose Rice, it requires 2 cups of water to 1 cup of uncooked rice. Start cooking.

5. For making sushi vinegar, combine the rice vinegar, sugar, and salt in a small saucepan. Bring it to a boil over medium high heat until sugar is completely dissolved. Set aside to let it cool.

6. When the rice is cooked, moisten a large bowl with water so the rice will not stick. Transfer the cooked rice into the bowl and spread out evenly to let it cool faster. 

7. While the rice is still hot, add the sushi vinegar over the rice. Use a rice paddle to slice the rice to separate the rice grains instead of mixing. Gently flip the rice in between slices. Repeat until rice is cooled.

8. Keep the rice covered with a damp towel until ready to serve or wrap.

Method for wrapping a maki sushi:
1. Some of the ingredients that I prepared for wrapping the nigiri sushi and maki sushi - carrots, Japanese cucumber, tuna spread, salmon, corn, egg mayo, crab sticks, etc...


2. Place a sheet of seaweed your sushi mat, with the rough side facing up. Spread a ball of sushi rice on top, evenly cover from the near edge to about an inch from edge. Keep your hands wet with a mixture of water and rice vinegar. 

3. After that add the ingredients that you like onto the center part, then top up with more rice.
Place them in a line, starting on the near edge of the rice layer. Some common maki ingredient combinations:
Basic tuna or salmon roll: These rolls typically just have just tuna or salmon rolled up, without any other ingredients.
Ahi roll: Yellowfin, cucumber, daikon, avocado.
Shrimp tempura roll: shrimp tempura, avocado, cucumber.
Phoenix roll: salmon, tuna, crab sticks, avocado, tempura batter (fried).


4. Hold the edge of the mat with your thumbs. Start with the edge that has your first ingredient next to it. Lift the seaweed sheet and fold it over the first ingredient. Make sure to keep the ingredients in place and that the rice sticks together.

5. Continue to roll. Tuck the front edge of the seaweed sheet into the roll, and remove the mat as you continue to roll the sushi. Roll slowly to ensure sushi coming out even.

6. Tighten the roll afterwards to keep ingredients from falling out when we cut it. Just roll it back and forth in the mat to tighten and seal it.

7. Allow the roll to sit for a minute or two before cutting it. Seaweed sheet will lightly moisten from the rice and less likely to tear.

8. Cut the roll into sixths or eighths using a sharp, wet knife. 


So these are some of the sushi I made. For the nigiri sushi, just take a small amount of sushi rice (about 3/4 the size of your palm), roll and squeeze it together until it rolls into a firm "log" sized rectangle. Then place a dab of wasabi on one side of the fish slice and then place the fish on the rice "log", with the wasabi side on the rice. Done!


I even made some really small ones for Abigail. Aren't they cute?


Besides sushi we also cooked Japanese Curry. Bought the curry from our recent Japan trip, so decided to make some good food with it. Topped up with unagi~


Last but not least, udon!


That's her second dinner after a bowl of porridge. No doubt my little lady has very good appetite at night...


Reader's Track 读者追踪器