Family trips

Our little princess Abigail has been traveling with us since 4 months old. Stay tune for more of our family trips!

Honeymoon in Maldives

A place where romance begins... And there is never a blue as beautiful as the waters of Maldives!

Sinchow Vietnam!

Go to Vietnam. Indulge yourself in the peaceful Hmong villages in Sapa, or experience cruising at The New 7 Wonders of Nature - Halong Bay.

Go West to U.S.

Napa Valley! San Francisco! And Monterey!.

Bali oh Bali~

We've done it 3 times!! Couple trip 2009, friends trip 2010, and family trip 2014.

Hello Macau, the oriental Portugal

Walking the oriental Europe. Remember to taste the most authentic Portuguese tarts!.

London

I was just a touch-and-go tourist in a short 3 days...

Babymoon in Boracay

Sea, sand, sun. And a new family member in my tummy!

Marrakech, a hidden jewel

Of palm groves, fire dancing, and dromedaries.

Siem Reap - day and night

Back to the ancient kingdom and find the tomb raider in you.

Home Cooking

Just some recipes and home cuisine for my family and baby.

Welcome to my blog!! 欢迎到访!!

No matter how you get here, I wanna say a big THANK YOU for visiting my blog. Do come back often for more! Blessed because we're given the chance to share. Thank you for visiting! 无论你是刻意或者不刻意的来到这里,都进来坐坐、聊聊天吧。幸福不是必然的,而是懂得分享人生的喜悦。谢谢到访!


November 12, 2014

Langkawi-Koh Lipe family trip 2014

Off we went for a short holiday again. This round we have 6 people, including my 82-year-old grandma and my little 21-month-old cheeky koala. It's another challenging trip having to travel with my grandma (Imagine boarding ferry and long-tail boat a few rounds with an 80+ senior citizen!! And yea we brought her out for the island hopping trip too~) but we've so used to running around everywhere with our oldest and youngest in the family, so it was considered a smooth one.

Holiday!!

Most people would go through Pak Bara, but we prefer Langkawi. To save time and effort on booking separately, we threw the task to our regular use agent to settle it, in fact the price is almost the same but we just have to pack and go. And I only booked Langkawi hotels on my own.
*If you want to have the contact you may just PM me through my email.

Langkawi - Koh Lipe Family Trip: October 2014 5D4N Itinerary
Day1: Penang - Kuala Perlis - Langkawi
Day2: Langkawi - Koh Lipe
Day3: Koh Lipe Snorkeling day
Day4: Koh Lipe - Langkawi
Day5: Langkawi - Kuala Perlis - Penang

Ferry ticket:
Kuala Perlis - Langkawi: RM18/adult/way, RM13/child/way, FOC for child below 3 years old
Langkawi - Koh Lipe: RM248/adult/return trip, RM208/child/return trip, FOC for child below 2 years old (P.s. I got the tickets at much lower price!)
(There are a few companies running this service in Langkawi, can depart from Telaga Harbour or Kuah Jetty)

Accommodation:
Langkawi:
Langgura Baron, Pantai Cenang (http://barongrouphotels.com/index.php?p=1_3_Langgura-Resort)
- Coco Valley Inn, Kuah Town (http://www.cocovalleyinn.com.my/)
*both also very convenient but not include breakfast

Koh Lipe:
Anda Resort, Sunrise Beach (http://www.andaresort.com/en/)
- Varin Beach Resort, Pattaya Beach (http://varinbeachresort.com/main_en/)
*both also include buffet breakfast

Food:
Langkawi MUST-EAT: Seafood of course. Per meal is about RM20-30/pax depending on the variety (food + drinks)
Koh Lipe MUST-EAT: Mussaman curry, BBQ seafood, fruit shakes

For Family trip MUST-BRING items, you may refer to the lists in the related posts below for reference.
How to pack light for your baby's day out during travel
Items to bring when traveling with baby


*My baby has been travelling with us since 4 months old, we've had 6 overseas trip including this one and many domestic trips, and we've had all sorts of ride (car, plane, bus, boat, train), so everything I share here is solely base on our experience.


Road trip to Kuala Perlis

Waiting to board the ferry to Langkawi at Kuala Perlis Jetty

Going 'duo'! I love the 'twin' look hehe...

Nice beach.

Night time at Anda Resort

Supper-ing sandwich in the room

Morning at the seaside - Sunrise Beach

Playing sand

Am I cute in the baby life jacket?

Little adventurer on the go~ Off we went for island hopping.

Swimming at Koh Rawi

Enjoying our time under the sun~

Beautiful waters

My 82-year-old granny also went island hopping with us!

And not forgetting about the scrumptious seafood!!

BIG BIG prawns!

Razor clams!!

More updates to come (provided I have time to write details by day hehe~

October 12, 2014

How to pack light for your baby's day out during travel

Happy 57th Merdeka to everyone!!
In conjunction with our national day holidays, I decided to blog on this topic base on my experience. In fact I owe my friends this update for some time already...
This is one of the popular search for mommies who has planned for a trip with their little ones.

How to pack light when going out with your little one? Let me just list down the main ones first, and I'll update from time to time when another new technique of  mine is proven workable okay...

1. Baby's luggage. 
This is one of the most essential item when going for a few days trip.
Refer to my photo below on how I usually pack her clothes. I use the travel luggage organizer as her luggage. Don't underestimate its space, I could squeeze in 1 week's clothes.
The trick: Roll the clothes instead of fold them. I even organize them in such a way that I can easily pull out 1 set of outfit for the following wear. Rolling clothes is always the best technique for space saving during packing luggage, it works well for adult clothes too!


2. Baby's handcarry backpack.
Think about avoiding a lot of bags when boarding the plane? Leave your diaper bag + mommy bag behind. Get a backpack instead. I opt for the soft type material with PU skin so that it is more stretchable and waterproof. Always think of the weather factor...I learned that from my first trip with LO to Taiwan, it was rainy and my diaper bag + mommy bag + backpack carrying her breast milk all got wet. (>*<)"
The trick: Pack only essential items plus additional 3 pcs of diapers and 1 set of clothes. Spare 2 extra meals portion (milk or biscuits) in case of any delay. 
What to include: Thermos for hot water, thermoflask for food (I use it to warm breastmilk when still breastfeeding), tumbler, milk (powder/breastmilk in cooler bag), milk bottle, 2 pacifiers, 5-6 diapers, wet wipes, changing mat, a few hankies, small feeding plate with cover and spoon, spare clothes & jacket, pillow, biscuits, 1 of her favorite toy/book, and some plastic bags.
Ground rules to follow so that you don't have to start 'digging' when searching for the items - heavy items at the bottom, frequent use items stack on top, small items in pockets. 
That's why I choose this type of backpack with a few compartments and pockets.


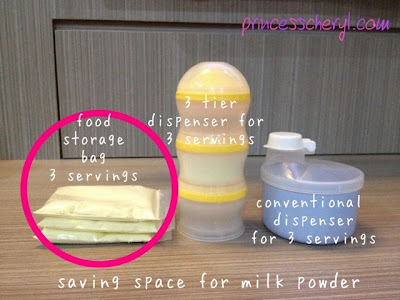
3. Space saving for milk powder storage.
When it comes to milk powder, the conventional way is to spare 3 meals in the dispenser, then the remaining meals in a small tin. Am I right?
The trick: Look at the difference in space occupied by each of these storage - food storage bag, 3-tier dispenser, and the 3-compartment dispenser. I would definitely go for the first one. I'm not going against recycling, you can still reuse the bags isn't it. After each serving, the total space occupied will definitely reduce.
And the following photo below shows the total space occupied in my luggage, for 6 days supply. 


4. Bring a light weight stroller and baby carrier.
The trick: Go hands-free with baby carrier when shopping or moving around in public transports, or even in the airport. Stroller can be your temporary shopping cart too. I always like baby carrier as my girl will just sleep whenever she wants to.


5. Bring a semi-transparent shawl.
I just realized that shawl is so useful from my recent trip. It can be your baby's temporary sunshade under the hot sun!
The trick: Easy to keep in the bag (almost weightless), and some new fun for the baby. As it's semi-transparent, baby can still see what's happening outside.


That's about all for now. Shall add in in future for new ideas. Or you may share in comment too.

By the way, this is my backpack size. My girl is now 19 months old, so you may estimate the size. :)


October 1, 2014

Homemade sushi for dinner!

28th August, sushi night at home

I realized Abigail was enjoying very much the Japanese rice when we were in Japan, so I decided to make sushi for dinner in one of those not-so-busy working day. Well...we miss eating Japanese food too... so ended up I took half day off to do the preparation. 

I had gathered some of the ingredients during weekend grocery shopping, and what's left to buy were Unagi and Salmon sashimi. Left company around 2pm, grabbed the fishes and reached home at 4pm. Ingredients preparation took me another hour plus. So I only started wrapping the sushi near 6pm, just in time for dinner.

The very last time I made sushi was back in year 2002 (wow that was really long ago!), and I had lost my cookbook... So this round I just base on gut feeling on the sushi wrapping hehe.

Ingredients:
Rice
3 rice cooker cups* (540ml) of uncooked Japanese rice* (I use Sumo Calrose Rice)
Water (follow instruction on the rice sack - 2 cups of water to 1 cup of uncooked rice)

Sushi Vinegar
⅓ cup (80 ml) rice vinegar
3 tbsp. sugar
1 ½ tsp. salt

Method for cooking sushi rice:
1. Rinse the rice in a strainer or colander until the water runs clear. 

2. Scoop the rice with your palm and gently rub them against each other. This is polishing. Rinse and discard water. Repeat this process 1-2 times.

3. Let the rice soak in water for 5 minutes. Drain out the water and transfer the rice into the rice cooker bowl. 

4. Add cold water following the instruction on the rice sack. Different brand may differ for the amount of water needed. The brand of rice I use is Sumo Calrose Rice, it requires 2 cups of water to 1 cup of uncooked rice. Start cooking.

5. For making sushi vinegar, combine the rice vinegar, sugar, and salt in a small saucepan. Bring it to a boil over medium high heat until sugar is completely dissolved. Set aside to let it cool.

6. When the rice is cooked, moisten a large bowl with water so the rice will not stick. Transfer the cooked rice into the bowl and spread out evenly to let it cool faster. 

7. While the rice is still hot, add the sushi vinegar over the rice. Use a rice paddle to slice the rice to separate the rice grains instead of mixing. Gently flip the rice in between slices. Repeat until rice is cooled.

8. Keep the rice covered with a damp towel until ready to serve or wrap.

Method for wrapping a maki sushi:
1. Some of the ingredients that I prepared for wrapping the nigiri sushi and maki sushi - carrots, Japanese cucumber, tuna spread, salmon, corn, egg mayo, crab sticks, etc...


2. Place a sheet of seaweed your sushi mat, with the rough side facing up. Spread a ball of sushi rice on top, evenly cover from the near edge to about an inch from edge. Keep your hands wet with a mixture of water and rice vinegar. 

3. After that add the ingredients that you like onto the center part, then top up with more rice.
Place them in a line, starting on the near edge of the rice layer. Some common maki ingredient combinations:
Basic tuna or salmon roll: These rolls typically just have just tuna or salmon rolled up, without any other ingredients.
Ahi roll: Yellowfin, cucumber, daikon, avocado.
Shrimp tempura roll: shrimp tempura, avocado, cucumber.
Phoenix roll: salmon, tuna, crab sticks, avocado, tempura batter (fried).


4. Hold the edge of the mat with your thumbs. Start with the edge that has your first ingredient next to it. Lift the seaweed sheet and fold it over the first ingredient. Make sure to keep the ingredients in place and that the rice sticks together.

5. Continue to roll. Tuck the front edge of the seaweed sheet into the roll, and remove the mat as you continue to roll the sushi. Roll slowly to ensure sushi coming out even.

6. Tighten the roll afterwards to keep ingredients from falling out when we cut it. Just roll it back and forth in the mat to tighten and seal it.

7. Allow the roll to sit for a minute or two before cutting it. Seaweed sheet will lightly moisten from the rice and less likely to tear.

8. Cut the roll into sixths or eighths using a sharp, wet knife. 


So these are some of the sushi I made. For the nigiri sushi, just take a small amount of sushi rice (about 3/4 the size of your palm), roll and squeeze it together until it rolls into a firm "log" sized rectangle. Then place a dab of wasabi on one side of the fish slice and then place the fish on the rice "log", with the wasabi side on the rice. Done!


I even made some really small ones for Abigail. Aren't they cute?


Besides sushi we also cooked Japanese Curry. Bought the curry from our recent Japan trip, so decided to make some good food with it. Topped up with unagi~


Last but not least, udon!


That's her second dinner after a bowl of porridge. No doubt my little lady has very good appetite at night...


September 18, 2014

Caramel Apple Banana puffs


This is actually an upside-down cake recipe that I modified from Cuisine Paradise. It is meant for baking using my Happy Call Pan, but I modified the ingredients and use steaming instead. I was so happy to be able to get back home earlier yesterday and do some snacks for my little lady. She is a picky eater who is still a vegetarian thus far... I really have problem to make her take meat! There's so many recipes that I thought I can try out but she would reject right away once she tastes meat texture. Somehow she's a fan of pastries, so most of the recipes I try are pastries.


Puff ingredients:
180g Self Raising Flour
3 Teaspoons Baking Powder
4 Large Egg
60g Organic Molasses Sugar
1/2 Teaspoon Vanilla Extract
Grated Rind of 1 Lemon
60ml Unsalted Butter, Melt
60ml Grape Seeds Oil

Caramel Apple Banana ingredients:
50g Unsalted Butter
60g Organic Molasses Sugar
50ml Water
2 Green Apple, skin remove and cored
1 Small Banana, skin remove
1 Tablespoon Lemon Juice
60g - 80g Golden Raisins


Method:
1. To prepare the Caramel apple banana; sliced the apple and banana into about 0.5cm thick, lightly marinate it with lemon juice. Set aside.

2. Simmer unsalted butter and organic molasses sugar over low heat until sugar dissolve and mixture begins to bubble.


3. Stir in marinated apple slices, water and continue to simmer over low heat for another 3 - 5 minutes till apple and banana slightly soften. When done, turn off the heat. Set aside and prepare the cake batter.


4. In a medium mixing bowl, whisk together eggs, organic molasses sugar and vanilla extract with a hand mixer till well-mixed (about 1 minute).


5. Next whisk in the melt butter, grape seeds oil and follow by the sifted flour mixtures (self raising flour + baking powder) and continue to stir until the flour is in-cooperate into the batter.


5. The batter will be slightly like thick cream texture before stirring in the remaining golden raisin.


6. Pour the mixture over the silicone mould prepared. Smooth the top and add in the caramel apple banana.


7. Steam it for 15 minutes until a skewer inserted and come out clean.


My cute little Hello Kitty Caramel Apple Banana puffs! Nicely done for my little Hello Kitty fans.


Needless to say she's excited over it and had one as supper~ Remaining were kept as breakfast and snacks for the next day.


Reader's Track 读者追踪器