Family trips

Our little princess Abigail has been traveling with us since 4 months old. Stay tune for more of our family trips!

Honeymoon in Maldives

A place where romance begins... And there is never a blue as beautiful as the waters of Maldives!

Sinchow Vietnam!

Go to Vietnam. Indulge yourself in the peaceful Hmong villages in Sapa, or experience cruising at The New 7 Wonders of Nature - Halong Bay.

Go West to U.S.

Napa Valley! San Francisco! And Monterey!.

Bali oh Bali~

We've done it 3 times!! Couple trip 2009, friends trip 2010, and family trip 2014.

Hello Macau, the oriental Portugal

Walking the oriental Europe. Remember to taste the most authentic Portuguese tarts!.

London

I was just a touch-and-go tourist in a short 3 days...

Babymoon in Boracay

Sea, sand, sun. And a new family member in my tummy!

Marrakech, a hidden jewel

Of palm groves, fire dancing, and dromedaries.

Siem Reap - day and night

Back to the ancient kingdom and find the tomb raider in you.

Home Cooking

Just some recipes and home cuisine for my family and baby.

Welcome to my blog!! 欢迎到访!!

No matter how you get here, I wanna say a big THANK YOU for visiting my blog. Do come back often for more! Blessed because we're given the chance to share. Thank you for visiting! 无论你是刻意或者不刻意的来到这里,都进来坐坐、聊聊天吧。幸福不是必然的,而是懂得分享人生的喜悦。谢谢到访!


Showing posts with label DIY. Show all posts

August 25, 2014

DIY play dough for babies and toddlers

Last Friday evening I decided to make baby-safe play dough for my girl. At toddler stage, usually all sorts of new stuff they will put into mouth, so it's always good to make an eatable one. I got the recipe online but made a slight modification by using the available ingredients in my kitchen.


INGREDIENTS:
2 cups of multi-purpose flour, half cup of salt, 2 tablespoon of vegetable oil, half tablespoon of vinegar, and 1.5 cup of boiling water
*Note: original recipe indicates 2 tablespoon cream of tartar, few drops of glycerine, and food coloring. But as I do not have these at home, I just replace the cream of tartar with vinegar and skip the glycerine and food coloring.

METHOD:
1. Mix the flour, salt, oil and vinegar in a large mixing bowl.
2. Add boiling water into the dry ingredients. (Coloring optional)
3. Stir all ingredients until it becomes a sticky, combined dough.
4. Allow it to cool down then take it out of the bowl and knead it vigorously for a couple of minutes until all stickiness is gone. (This is the most important part of the process so keep till it's perfect consistency!)
5. If the stickiness remains, add a touch more flour until it's just right!


Completed product! Fun time for my little girl.


The papa also joined in and made her some stars...


Counting starsss~~ Her favorite shape all the time.


I keep the dough after play time by wrapping it up with the cling wrap and put into fridge. Can be used up to a few times till today.

August 19, 2014

Homemade steam cake in 15 minutes

Yum

It's time for some homemade delicacies for my little princess again!

I love the simple to prepare recipes without fuss. Nowadays the little girl seems to run around faster than me, so it's quite tiring for me to keep her out of kitchen...

Tonight I made this super easy steam cake for her, can be served as breakfast tomorrow morning. Done in15 minutes.


Ingredients: 8tbs (scrape off with knife, else 4 tbs full*) self-raising flour, 4 tbs milk/soy milk, 1 tbs caster sugar and 1 tbs Milo powder


Method:
1. Measure the flour, milk and sugar in a bowl then mix well.
2. Add in Milo powder afterwards and stir in circle motion to create marble-like pattern.
3. Pour the mixed ingredients into a medium size bowl then steam for 15 minutes.
4. Check if the cake is done by poking a chopstick into it. If it's not sticky then it's done.


My Milo steam cake!


The texture is medium soft and a bit moist. But the moisture will slowly vaporize after leave it for some time. So it will not become too hard and crusty after exposed in air.


Instead of serving as breakfast she has eaten off quarter of it! Hmm...slightly heavy supper eh?


August 15, 2014

Homemade pizza in 5 minutes

Yum

Hungry at home and need a quick meal? Well the kids are running around and need your attention, and you don't have enough time to cook some hot meals while you're bored with eating sandwich. 

Hmm...what about making an instant pizza? Think of the flavorful hot melted cheese... Ooo...

All you need are these ingredients in your kitchen:
Bread, grated cheese, sandwich spread, sausage, spices and mixed herbs. 
And of course you will need your microwave oven or stove.


Method:
1. Apply a layer of sandwich spread over your bread. Then top with a generous amount of cheese - Cheddar/Mozarella/Parmesan. I normally use grated cheese plus Mozarella.

2. Slice the sausage and add on to the cheese. Too up with more cheese to cover the surface. You may add the toppings per own preference - capsicum, mushroom, etc.. Or even replace the sausage with ham, bacon, tuna chunks, sardine, etc..
*Sausage is not a healthy option especially for toddlers, suggest to totally exclude it or replace with other ingredients.

3. Sprinkle with paprika/chilli powder and mixed herbs if you like. 

4. Microwave for 3 minutes. Healthier option for toddlers will be by steaming for 5 minutes or more, until toppings are cooked and cheese melted.
*Depends on the amount of pizza you make. I have also tried just 1 slice and it only needed 30-40 seconds in the microwave.


5. Ready to serve! All done around 5 minutes.


Ooo come and feel the cheese explosion~~ 


For toddlers you may go plain. It's just as good isn't it? Well you may as well exclude the chilli powder. These were for ourselves as supper.


Easy isn't it? No more fuss for a quick but delicious light meal! :)

Well, you may continue to have some 'shaking' fun time with your kids after this making the 5 minutes DIY ice-cream (link: http://www.princesscheryl.com/2014/08/homemade-ice-cream-without-any-machine.html)

August 11, 2014

Homemade ice-cream without any machine

Yum

What is the fastest way to get an ice-cream? DIY at home! In just 5 minutes. 

Yes, just 5 minutes! You didn't hear me wrong.

All the while I kept searching for no-churn recipe and still it took me quite some preparation time of at least 30 minutes. And I was tired with all the washing afterwards...

And then, I came across an article days ago, and this method totally blown off my mind. *claps!!*

Only 5 minutes to get a few servings of ice-cream! So here is the recipe, I've successfully made it tonight and we've just finished it.

Ingredients and tools:
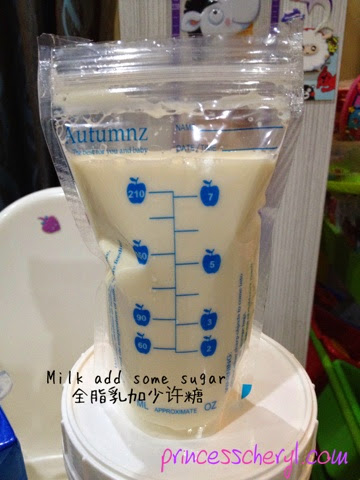
Ice cubes, full cream milk/fresh milk, a plastic container with cover, a breast milk storage bag/zip lock bag, 6 teaspoon of salt, some sugar for sweetening


Yes that's all you need!


Method:
1. Fill up the breast milk storage bag or zip lock bag with 200+ml of milk. Add some sugar and slightly stir it. Zip it tight to avoid spillage.


2. Dip the whole bag into the container which has been filled up with ice cubes and the salt. Cover it with more ice cubes.


3. Cover up the container and start shaking up-down-left-right in all directions. Just enjoy shaking it~

4. Shake continuously for 5-10 minutes. The salt will help to further lower the temperature and creating a flash freezing environment. It's amazing! You get to freeze your milk into ice-blended form within 5 minutes.


5. After 5 minutes. Ready to serve!! Have it plain or add toppings.


See how much my little cheeky pie enjoyed it~


The texture is similar to ice-blended smoothie but more solid. Have it a try today!

But make sure you consume it within 5 minutes after served, it melts pretty fast too. :)

Reader's Track 读者追踪器